Making a Custom Angular Quickstart Template


One of the most time consuming aspects of starting a new angular project, or any project for that matter, is getting the app to a state where you can actually start doing real development. I'm talking about creating the app, hooking up authentication, setting up a styling library, adding any component libraries, setting up modules, etc. Making a custom Angular quickstart template can really kick start a new project. I'm going to show a brief example of what I mean and hopefully give some great ideas on how you can do the same.
The Angular team has done an amazing job with the CLI, and the ability to 'ng new' a new app is amazing, but there are still all those things I listed above, and more, that need added.
Follow @ScriptBytesIOThe majority of the apps I write in my day job are internal business applications, so they all have a set of standards we try to follow. One of the best things we did at our company was making a custom angular template for our UI's, as well as templates for almost all aspects of our apps. The UI, API, database scripting, and continuous integration all have some type of a template. This made starting a new project so much easier, quicker, and less stressful. I'm gonna go through the steps to set one up for an Angular project so you can get a jump start on your next project.
Installing Dependencies
Let's install and/or update everything we need in order to use the angular cli to create a new project.
- Install the latest version of Node
- Node installs NPM, but grab the latest version to be safe: npm i -g npm@latest
- Install the latest version of the angular cli: npm i -g @angular/cli@latest. If you already have it installed and need to update, uninstall it first with: npm uninstall -g @angular/cli
- Install the latest version of GIT.
- Not a required install, but I do all my Angular development in VS Code.
Using the CLI to Create the Quickstart Template
We're going to use the Angular CLI, so in your terminal of choice, navigate to a folder to create our new angular project. I'm going to use the following command to create my app, but feel free to add or remove any other options as you see fit. I always check the CLI website for any new/changed options.
ng new NgTemplate --routing=true --style=scss
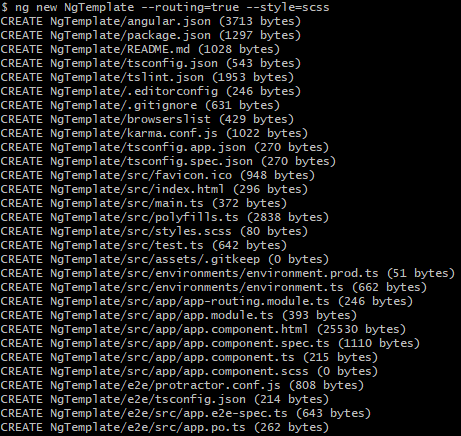
Ng new does a lot for us by default. It creates the entire app, runs npm install, and does a git commit of everything that was created so we have a clean git repo.
Open the newly created folder in VS Code. One trick to do this from our terminal is to do:
- cd NgTemplate
- code .
cd NgTemplate changes directory into the folder where the app was created, and code . opens all the files in vs code.
Adding Third Party Libraries
Styling
A lot of the stuff that follows may not fit exactly what you need for your project. You might have a different app structure you like to follow, or a different UI library, or a home-grown component library, but this will give you a great idea of where to start. Just remember to follow any development standards you or your company have created.
I like to use Bootstrap for our styling library. Here's a quick setup for bootstrap 4.
- Install using
npm i bootstrap -s - Import in styles.scss using
@import '../node_modules/bootstrap/scss/bootstrap.scss';
Component Library
I always use a component library in my projects, and have used several different ones over the years. For this example I'm going to use Angular Material. However, this can change a lot depending on your personal preference or company standards.
Angular Material utilizes an angular schematic to add to a project, so you can get it all set up with a simple command: ng add @angular/material
The schematic will prompt you for a few selections like the theme, setting up HammerJS, and setting up browser animations. I chose yes for HammerJS and animations.
The schematic did a lot of stuff for us. It installed the needed packages, updated the angular.json with the style sheet location, added a little styling to our stylesheet, and updated our app module with the BrowserAnimationsModule.
I'm going to go ahead and leave all of that alone except one thing. I'm going to move the styling out of the 'styles' array in the angular.json file and put it in the styles.scss.
Now my styles.scss looks like:
@import '../node_modules/bootstrap/scss/bootstrap.scss';
@import '../node_modules/@angular/material/prebuilt-themes/pink-bluegrey.css';

html, body { height: 100%; }
body { margin: 0; font-family: Roboto, "Helvetica Neue", sans-serif; }
Shared Module
I like to keep my app module pretty clean, so I import and export all of my shared 3rd party components using a shared module. I also use the shared module for any components I feel will be shared across multiple sections of my app.
Let's create the shared module using the angular cli with ng g m shared. The g is shorthand for generate, and m is shorthand for module. This creates a new folder named shared, with a shared.module inside it.
Now that we have a shared module, let's use it to share something. Since I'm using the Angular Material library, let's share the form field module. I have imported the MatFormFieldModule, and put it into an array called modules. Then I added that modules array to the imports and exports. Here's how the shared module looks now:
import { NgModule } from '@angular/core';
import { CommonModule } from '@angular/common';
import { MatFormFieldModule } from '@angular/material/form-field';

const modules = [
  MatFormFieldModule
];

@NgModule({
  declarations: [],
  imports: [
    CommonModule,
    modules
  ],
  exports: [
    modules
  ]
})
export class SharedModule { }
You don't have to make the modules array, you could just add MatFormFieldModule directly to the imports and exports, but I do this in my shared module because I almost always import and export all the modules, so it avoid me from having to type/copy paste the module name into both the imports and exports array. I'm lazy.
The reason we do this in a shared module is mostly for cleanliness. It eliminates us from having to import every single 3rd party module into our own feature modules. We do it once in the shared module, then import the shared module into our feature module.
Navbar Component
Having a navbar, side bar, or some type of menu system is pretty common in a lot of apps. I'm going to create a navbar component that will be a bar at the top of the page, but first let's create the component using the cli: ng g c navbar. The c is shorthand for component.
This creates a navbar component in our root directory and adds it to our app module. This is one of the few components I keep in the root of the app, just because it's used across the entire app.
I'm going to add a simple menu to our component html. I got this from bootswatch.com's 'default' theme. Bootswatch is a great resource for some free bootstrap templates.
<nav class="navbar navbar-expand-lg navbar-dark bg-primary">
  <a class="navbar-brand" href="#">Navbar</a>
  <button
    class="navbar-toggler"
    type="button"
    data-toggle="collapse"
    data-target="#navbarColor01"
    aria-controls="navbarColor01"
    aria-expanded="false"
    aria-label="Toggle navigation"
  >
    <span class="navbar-toggler-icon"></span>
  </button>

  <div class="collapse navbar-collapse" id="navbarColor01">
    <ul class="navbar-nav mr-auto">
      <li class="nav-item active">
        <a class="nav-link" href="#"
          >Home <span class="sr-only">(current)</span></a
        >
      </li>
      <li class="nav-item">
        <a class="nav-link" href="#">Features</a>
      </li>
      <li class="nav-item">
        <a class="nav-link" href="#">Pricing</a>
      </li>
      <li class="nav-item">
        <a class="nav-link" href="#">About</a>
      </li>
    </ul>
    <form class="form-inline my-2 my-lg-0">
      <input class="form-control mr-sm-2" type="text" placeholder="Search" />
      <button class="btn btn-secondary my-2 my-sm-0" type="submit">
        Search
      </button>
    </form>
  </div>
</nav>
Now let's get the nav bar added to our app.component. Remove all of the default html that the cli created and add <app-navbar></app-navbar>.
Security
Another very common feature needed for a business application is security. I like to at least have a security module and authentication service. Let's create both of those, and add the skeleton for some function calls.
Add the module with ng g m security and add a service with ng g s security/services/auth. S is shorthand for service, and by doing security/services/auth, we put it into the security folder that was created when we created the module, and then in a services folder. Putting it in it's own services folder isn't necessary, but it keeps the module folder from getting cluttered with a lot of files.
Let's also create a class to hold any user information. ng g cl security/models/user --type=model. I like to have my classes generated in the form 'className.model.ts', hence the use of the type option.
Now let's add a few things to our auth service that we'll need. I'll put in a BehaviorSubject to funnel our user through so our app can act reactively to user changes, and some functions for logging in, logging out, and checking if the user is authenticated. I'm only going to lay the foundation for this service, because how you implement these will change drastically based off how you do authentication.
Here is the result
Conclusion
So far this doesn't seem like it's all too helpful, but this is just an example of how to get this off the ground and to show what types of things can be done. Customize it to fit your personal project needs, or to kick start a template for your company with your own standards. Add things you need like
- Admin module to manage users
- Log in page
- Http interceptor to add authentication tokens to outgoing calls
- Messaging/Notification service to display notifications of actions or issues to the user
- Error logging
Do you like this idea or use something similar? Let me know by commenting below or tweeting me!
Here is a link to the template project on GitHub. In the future I may expand on this and add some of the things I listed above and use this for myself in future personal projects.