Entity Framework Migrations with SQL Server


Entity Framework Migrations is a very powerful tool that helps you maintain your database so that the structure of that database matches the objects you are using in your API application. Changes that you make in your code can be migrated into your database so that they stay in sync. I am going to show you how you can use Entity Framework Migrations with SQL Server. In this demo I will be running the SQL Server instance on my local computer, but the concept is the same if the instance were running on a server or in the cloud.
Getting Started
I am going to use a very small .Net API from a super basic ToDo app that I wrote. If you don't have your own application to follow along with, you can get the code here on Github, be sure to use the localSqlMigrations branch.
Entity Framework Migrations needs 2 main things inside of your code in order for it to work:
- Entities that represent the tables in the database
- A database context that tells entity framework to use those entities.
Let's start with the entities. In my Todo app, I have one entity called Todo. Here is what my entity looks like:
public class Todo : IDBEntity
    {
        public int Id { get; set; }
        public bool Completed { get; set; }
        public string Description { get; set; } = string.Empty;
    }
It's a pretty simple class with an Id as an integer, a boolean for whether it's completed or not, and then a string field for the Description which is assigned an empty string value by default.
You can ignore the interface here, IDBEntity. This is something I've been using with my generic repository. It's just an interface that requires the class have an Id field.
Now let's go check out the database context. Here is the contents of my TodoContext file:
There are three important parts in here. The first is on line 1 where we inherit our class from the DbContext class. The DbContext class is a class from Microsoft that gives us all the functionality we need in order for Entity Framework to translate our code and entities into database queries and tables.
The second is on line 10, which tells the context that there is a DbSet of type Todo, called Todos: public DbSet<Todo> Todos { get; set; } This is very important as it is telling Entity Framework that there is a table in our database, and its structure matches the Todo class. We'll see exactly how that is done when we run our first migration.
The third important part is line 22, where we tell Entity Framework that our database is SqlServer, and we pass it the connection string so it knows how to connect. If you wanted to use a different database, for example PostgreSQL or MySQL, then you would define that here.
In order for us to use SQL Server, we need to install a nuget package. So open up your nuget package manager for you project and install this package: Microsoft.EntityFrameworkCore.SqlServer.
Lines 14-20 are getting the connection string. In this example I'm storing the connection string in an environment variable, which I define in my appsettings file. You don't have to do it this way if you don't want to. If you'd like you can store the connection string directly in the app settings file, but just beware, that means you are checking in your database credentials into your source control system, which can be dangerous if your repository is public.
I don't hard code the variable name in code, so I'm pulling the name from my app settings in the section EnvKeys:TodoDbConn. I do this mainly because when I'm developing my API locally, sometimes I point to a local database, and other times I point to a dev database that might be sitting in the cloud. Doing it this way allows me to have 2 different connection strings on my computer, and I can quickly switch back and forth between the two.
Here is what that section of my appsettings file looks like:
"EnvKeys": {
    "TodoDbConn": "TODODBCONNECTIONLOCAL"
  }
To set the environment variable, you can open a plain Windows Command prompt and run the command: setx TODODBCONNECTIONLOCAL "Data Source=localhost;Initial Catalog=TodoDB;User Id=YourUser;Password=YourPassword"
Creating Our First Migration
Now that we have the database context and entities set up, we're about ready to create our first migration. In order to do that, we need to install EF Core Tools package. Go to the Package Manager for your project and install this package: Microsoft.EntityFrameworkCore.Tools.
After that is installed, we can create our first migration. Open up the Package Manager Console and run the command add-migration InitialMigration.
Assuming that everything is set up correctly, this should complete and then open a new migration file. This migration file is found under the newly created Migrations folder at the root of your project. This is also where all future migrations are added. This is what my migration file contains:
public partial class InitialMigration : Migration
    {
        protected override void Up(MigrationBuilder migrationBuilder)
        {
            migrationBuilder.CreateTable(
                name: "Todos",
                columns: table => new
                {
                    Id = table.Column<int>(type: "int", nullable: false)
                        .Annotation("SqlServer:Identity", "1, 1"),
                    Completed = table.Column<bool>(type: "bit", nullable: false),
                    Description = table.Column<string>(type: "nvarchar(max)", nullable: false)
                },
                constraints: table =>
                {
                    table.PrimaryKey("PK_Todos", x => x.Id);
                });
        }

        protected override void Down(MigrationBuilder migrationBuilder)
        {
            migrationBuilder.DropTable(
                name: "Todos");
        }
    }
This file has two functions in it, Up, and Down. The Up function is the code that is executed when adding this migration to the database. In our case it is for creating the Todo table. The Down function is for removing the migration from the database, in our case removing the table.
Let's review the Up function. First it is telling the migrationBuilder to create a table. The name of the table is Todos.
Next is the list of columns. The first is called Id, it's an integer, it's non-nullable, and it's the identity column starting at number 1, and incrementing by 1 for each subsequent record. The second column is called Completed and it's a non-nullable bit. The third is Description, which is a non-nullable field of type nvarchar(max).
Lastly it defines any constraints, which in this case it's creating a PrimaryKey constraint called PK_Todos on the Id column.
Now let's review the Down function. In this case it's quite simple. All it is doing is telling the migrationsBuilder to drop a table with the name of Todos.
There is also another file in the Migrations folder, which is the current ContextModelSnapshot. This file is essentially a reflection of the current state of the database, according to your migrations. Entity Framework uses this file to determine what changes have been made to your code, if any, and what actions it needs to take to make those changes.
Making Changes to the Migration
There are a few things that might stick out to you when you see what is being created for the Todos table. For example, why did it make the Id column an Identity field, and why is it the Primary Key? Why are all the fields non-nullable? And why is the Description of length max?
That is because Entity Framework makes a lot of assumptions based off of how you name your entity properties. For example, any numeric or GUID field with the name Id, or <entity>Id (ex: TodoId) will be the primary key. Any primary key that is numeric will also be set as the identity field. More info from Microsoft here.
Why are they all non-nullable? Because none of our properties are defined as nullable. If we specified a specific field as nullable, we would see that reflected in the table creation.
The reason Description is of length max is because we didn't specify a max length for it. So let's go back and make some changes to our entity and see how it changes the migration.
First we need to undo our migration by going to the Package Manager Console and running the command remove-migration.
Now let's go into our Todo entity and change a couple of things on the Description field. Let's make it Nullable by adding a question mark after string, and let's give it a max length of 250 characters. Here is how you can do that:
[MaxLength(250)]
public string? Description { get; set; } = string.Empty;
Now if you re-run your migration with the same add-migration command as before, you'll see the output in the Up function to be a little different for the Description column. It is now an nvarchar(250) instead of nvarchar(max), and it is now nullable.
Description = table.Column<string>(type: "nvarchar(250)", maxLength: 250, nullable: true)
Applying Our Migration
Once you have reviewed the migration output and determined that it looks correct, you can then apply it to the database. There is a few different ways that you can do this (see here for more information), but I'm going to show you how to do it using the Package manager Console in VS 2022.
Open your Package Manager console and run this command: update-database.
That's all there is to it. Assuming your connection string is applied correctly this should update your database with the changes. You can now log into your SQL Server and take a look.
Here is a screenshot of my server with the newly created database TodoDB, and new table Todos:
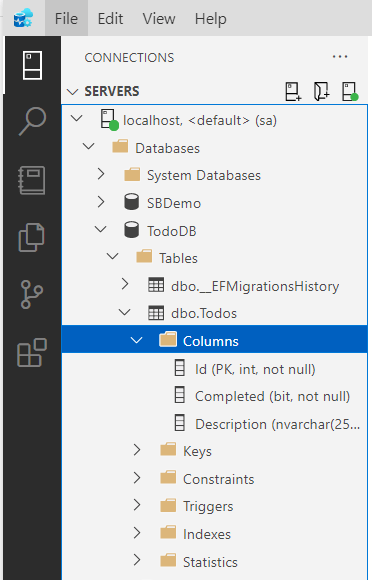
Fun fact, I'm actually running this SQL Server instance from a Docker container. Check out my post here if you're interested in how to do that.
Migrations also added one other table to our database, called __EFMigrationsHistory. This is how Entity Framework keeps track of which migrations have already been applied to the database. Whenever a new migration is applied, the name of that migration file is added as a row into this table. This prevents Entity Framework from applying the same migration multiple times.
Conclusion
Hopefully this helps you utilize migrations for maintaining your database. There are of course way more things that you can do with migrations, but this is a great start. Please comment below if you would be interested in seeing a more in depth article on migrations.
Thanks for reading!