Run SQL Server in Docker


If you use SQL Server on your local computer when doing development for your applications, it might be worth looking into running your server in a Docker container. When you run SQL Server in a docker container, it gives you several advantages. I'll cover some of the main advantages, and how you can quickly set up a server on your computer.
I also made this into a Youtube video. The content is very close to the same.
Advantages
- You can quickly spin your server up and down. This is really nice when you are testing out changes and modifications to your data structures. If you make a mistake, it's a lot easier to revert or fix in a local copy, rather than in a dev or test environment where it has a larger impact.
- It allows you to try out new or different versions very quickly. For example if you want to try out the latest beta or preview version, it's very easy to do.
- It's cross platform, so you can run this on your Windows, Mac, or Linux computer. However at the time of this writing, there may be some limitations on the Apple M1 and M2 chips.
Pull and Run Container
To get started, go to the docker hub page for SQL Server:
https://hub.docker.com/_/microsoft-mssql-server
Under the Featured Tags section, copy the line for the version that you would like to use. In this example I will use the 2019-latest version.
Open up your terminal and paste in that pull command. Here is the command I'm using:
docker pull mcr.microsoft.com/mssql/server:2019-latest
Once that image has finished downloading we can run the image. Here is the command to run the image:
docker run -e 'ACCEPT_EULA=Y' -e 'MSSQL_SA_PASSWORD=LikeAndSubscribe!1' -p 1433:1433 -d --name sqlserver mcr.microsoft.com/mssql/server:2019-latest
Here is a breakdown of everything we're passing in:
- 'docker run' is the command we are running
- -e means environment variable. We are passing in 2, the first is ACCEPT_EULA, with a value of 'Y'. This is telling SQL Server that we accept the end user license agreement.
- The second environment variable is MSSQL_SA_PASSWORD with a value of 'LikeAndSubscribe!1'. This is setting the password for the sa user. You can change this to whatever you want, but it needs to meet the password complexity requirements.
- -p 1433:1433 means we are mapping port 1433 from the container to port 1433 on our local machine. 1433 is the default port for SQL Server.
- -d means detached mode, so the container will run in the background.
- --name sqlserver gives our container a name of 'sqlserver' so we can reference it later.
- mcr.microsoft.com/mssql/server:2019-latest is the image we want to run.
Connecting to SQL Server
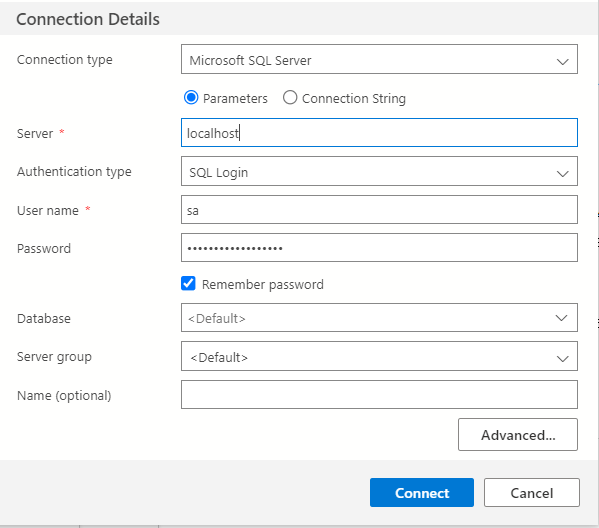
Now that the container is running, you can connect to the server. Open up your favorite database management tool and connect. I recommend Azure Data Studio.
The server name is localhost. If localhost doesn’t work, try 127.0.0.1. The user name is sa, and the password is the password you used in the docker run command.
Once connected, you can do anything with this database that you could with a ‘normal’, non-containerized instance of SQL Server.
Here's an example SQL script you can run to test the connection:
This gives you a working SQL Server instance. Depending on your situation, this may be all you need. With this running you can quickly spin it up and down. You can use it to test run scripts, or point a local API to it to test changes like migrations.
As long as the container is not deleted, any changes you make to it will persist.
Persisting Data
If you want to persist the data even if the container is deleted, it's not too hard. We have to use volumes. What we have to do is pass in a few more arguments to our docker run command to tell SQL Server where the various data should be saved.
Here is the new command with the included parameters for the volumes:
docker run -e 'ACCEPT_EULA=Y' -e 'MSSQL_SA_PASSWORD=LikeAndSubscribe!1' -p 1433:1433 -v 'C:/DockerVolumes/SqlData/data':/var/opt/mssql/data -v 'C:/DockerVolumes/SqlData/log':/var/opt/mssql/log -v 'C:/DockerVolumes/SqlData/secrets':/var/opt/mssql/secrets -d mcr.microsoft.com/mssql/server:2019-latest
Here -v means that we're telling docker about a volume. The syntax for this is HostLocation:ContainerLocation. This is passing in three volumes, one for data, one for log, and one for secrets. I'm running this from a windows computer, and my host folder is C:/DockerVolumes/SqlData/.
Here is the documentation page from Microsoft on volumes.
Now if you run the above docker run command, and then reconnect, and re-run the database population script from above, you'll be able to start, stop, and even delete the container without losing any data. As long as you don't lose the data, log, and secrets folders on your host, and use the same paths when running the above docker run command, you'll be all set!