Setup and Deploy Angular App to Google Cloud Run


Google Cloud Platform (GCP) can be daunting when you first look at it. It seems like there are 1 million different options and you don't know what to choose. The good thing is it's not as bad as it seems. If you are running a front end application for a website or a REST API, Cloud Run can do it. Here is a step by step guide on how to deploy Angular to Cloud Run using Cloud Build.
There are a couple different ways that you can deploy an application to Google Cloud Run. This post is going to cover deploying utilizing Google's Cloud Build tool that continuously deploys when our code is pushed to Github. Cloud Build can be a little intimidating at first, but once you get the hang of it, it's a very powerful tool.
Check out my youtube video that is loosely based off of this blog post:
Cloud Run Setup
The app I will be using for the demo is a super simple ToDo app that I threw together that is written in Angular. Source code here.
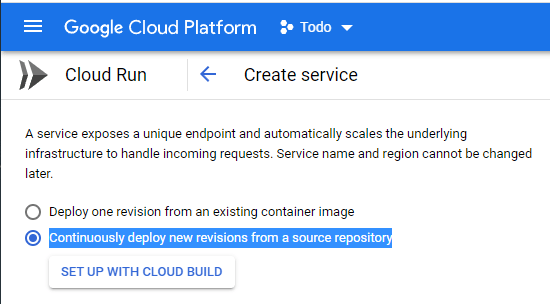
First thing you need to do is go to the Google Cloud Console and create a Cloud Run service. When on the Cloud Run page, click the Create Service button. From here you will have several options. The first is what we are running. We want to select "Continuously deploy new revisions from a source repository".
Cloud Build Setup
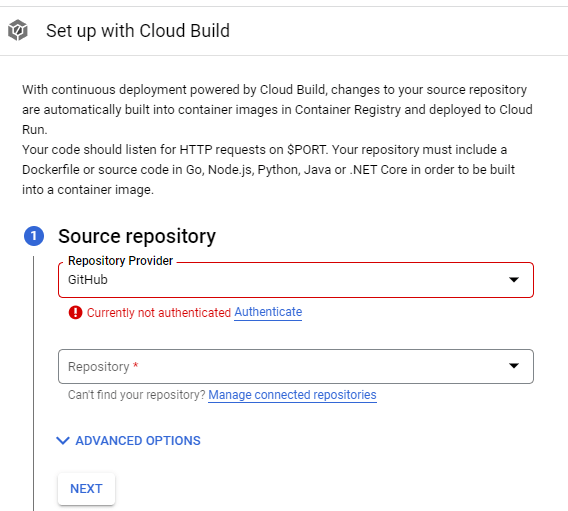
Then click the "Set up with Cloud Build" button. This will open a side panel where you need to enter info about where the source code repository is located.
You will probably be prompted to enable an API or two, specifically the Cloud Build API. Go ahead and enable them. That will give those tools permissions to run on your account.
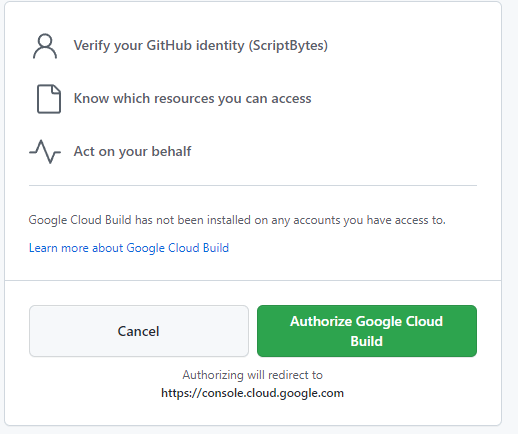
Choose your git repository provider, mine will be Github. Then you will need to authorize Cloud Build to read from your repository. Click the Authenticate button and you will get a popup with a list of permissions it needs. Click the Authorize Google Cloud Build button.
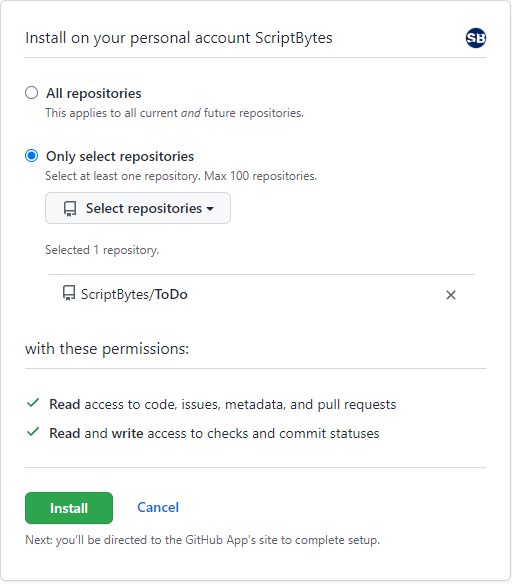
Now you may get prompted with a warning saying "The GitHub App is not installed on any of your repositories." Click "Install Google Cloud build". From there you'll get another popup asking if you want to give permissions to all of your repositories or a specific one. I will just choose a specific one for this demo.
Check out my post on creating a Custom Angular Data Store.
Finishing Service Setup
Back in GCP, check the I understand checkbox and click Next.
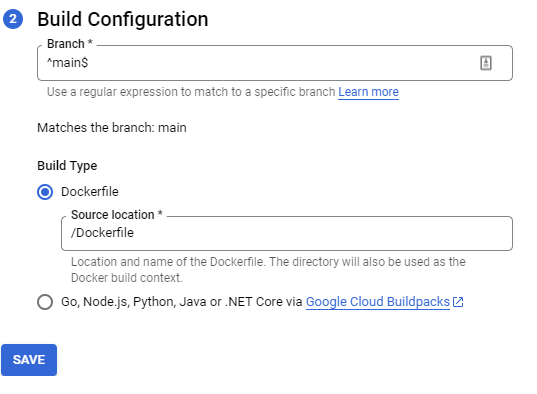
Select the branch you want to build from, and then choose Dockerfile as the Build Type. Click Save.
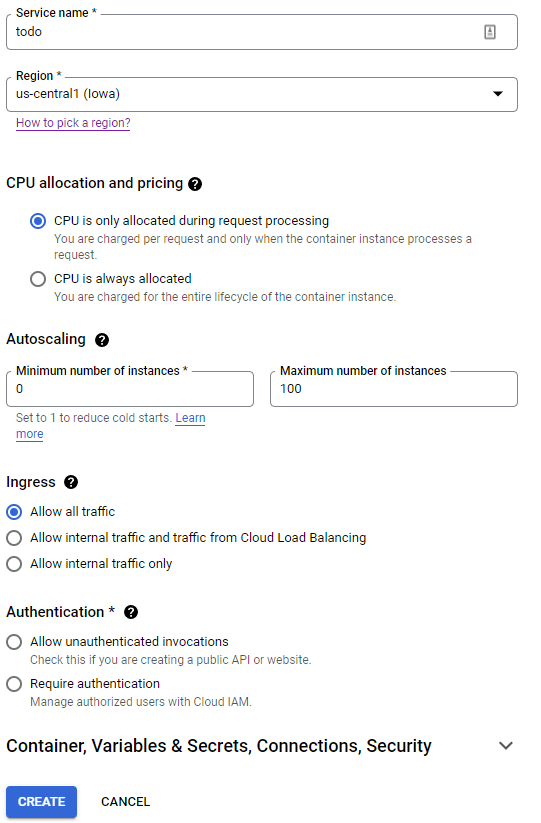
Now we need to fill in the rest of the details about the service. Choose a name and region. Ideally pick a region that is geographically close to your location.
What you choose for CPU allocation depends on your situation. If you want your app to be instantly available all the time and always have CPU allocated, choose the always allocated option. I usually always pick the option for "CPU is only allocated during request processing". This will also help reduce your bills.
For Autoscaling I leave it at the defaults of 0 and 100.
Ingress, choose Allow all traffic.
For Authentication, choose Allow unauthenticated invocations.
Container Options
The last bit to fill out is the different options for the Container, Variables & Secrets, Connections, and Security. For this demo I'm going to leave everything here as it's default.
Click create and this will create our service.
The first time the service is created, it will try to build and deploy the image. This will fail as we need to make modifications to the Continuous Deployment settings.
At the top of the Service Details page, click "Edit Continuous Deployment".
Finalizing the Continuous Deployment
This screen is where you can edit the Trigger for your cloud build. A Trigger is exactly what it says, it's a definition of how/when to trigger a build based off some criteria. In our case, that criteria is a push to the github repo under a certain branch. There are a few things we need to change on this page.
First, update the name and description if you would like. It fills them in with randomly generated names that are often pretty ugly.
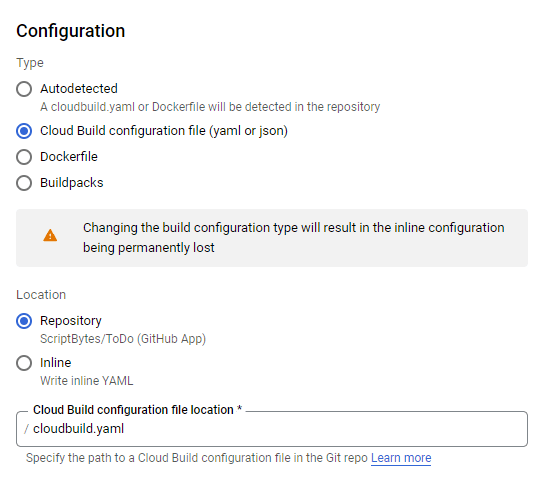
When Cloud Build first initializes, it is going to create its own inline cloudbuild.yaml file that is part of the build Trigger. This is the file that has the build instructions in it. We want to use our own located in our repo. I have a demo in the root of the github repo, which you can copy and use as it is. It shouldn't require any changes to get it working. Under the Configuration section, change the location of the file from Inline to Repository, and leave the file location path as the default which should be /cloudbuild.yaml.
Substitutions
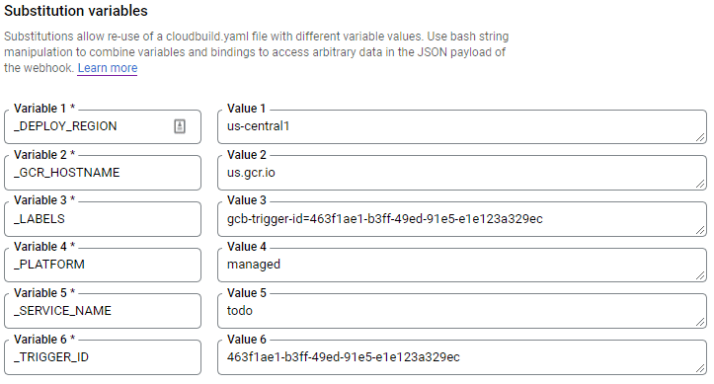
A great part of cloud build and the yaml file is that you can pass in parameters to be substituted in your file. This makes it so that the same file could be used for another project, and you only have to change the parameters values being passed in. Here are the variables I like to have set up, which are generally created by the cloud build when you set it up.
Cloudbuild.yaml File
Here is the full cloudbuild.yaml file utilizing the above variables as well as the built in variables provided by GCP. Here is the GCP documentation for the default variables and rules on creating your own.
It is important to note that it's important to have the cloudbuild.yaml, dockerfile, and ngingx.conf files in the root of the project. We told GCP to look for cloudbuild.yaml in the root. Cloudbuild.yaml is then assuming the dockerfile is also in the root, and the docker file is going to copy the nginx.conf file from the root as well.
This yaml file has 3 steps to it:
- Run the docker build command using the dockerfile in the current directory and tag the image with the name '$_GCR_HOSTNAME/$PROJECT_ID/$_SERVICE_NAME:$COMMIT_SHA'
- Run docker push to push your image to your google container registry at the address '$_GCR_HOSTNAME/$PROJECT_ID/$_SERVICE_NAME:$COMMIT_SHA'
- Use the Google Cloud SDK to deploy to Cloud Run for the given $_SERVICE_NAME, using the image we pushed in the previous step, to the given $_DEPLOY_REGION.
Docker
The first step of the cloudbuild file above is to call docker build for the dockerfile for the current directory. Here is the contents of that dockerfile. This file needs to be in the root directory of the project.
This is a pretty basic dockerfile, but here is the basic steps:
- Using node version 16.14.0, copy the package.json and package-lock.json into the current working directory of the container, which we set as /source
- Run npm ci. We use ci here so that it uses exactly what is in the package-lock file. Using the package-lock file means we get the exact same packages and versions installed each time.
- Copy the rest of the files into the current working directory. We do the copy in 2 stages because of how docker handles layers and caching. If only code files are changed and not either of the pacakge.json files, then the previous step will be cached which will speed up builds in the future.
- Run the 'npm run build' command, passing in the prod configuration default value. The default output folder for angular build commands is /dist, which we use next.
- Then using the NGINX image, copy the files from the previous build step located at /source/dist/todo into a folder at /usr/share/nginx/html. Also copy the nginx.conf file into the appropriate nginx folder. The nginx.conf file needs to be in the root
- If you use this Dockerfile, you need to modify this line:
COPY --from=build /source/dist/todo /usr/share/nginx/html. Instead of 'todo', you need to replace that with the name of your angular application. This is the name that appears under the "projects" node in the anuglar.json in your project.
- If you use this Dockerfile, you need to modify this line:
- Expose port 8080 to the outside of the container. This is the port that GCP uses by default.
With all that done, push your changes to Github, then the build will be triggered and pushed to cloud Run and your app should be up and running!